


1.需求
公司机房需要reinstall os
2.pxe原理
2.1 原理与概念
事实上把PXE称作是一种引导方式而不是安装方式似乎更加准确,
PXE(Pre-boot Execution Environment)是由Intel设计的协议,
它可以使计算机通过网络启动,
但是有一个前提条件是计算机的网卡必须具有引导功能,
这个网卡中要有一个PXE客户端。
当计算机POST自检成功以后,BIOS把网卡中ROM的PXE客户端调入内存执行,
PXE客户端通过网络中的DHCP服务器获取一个IP地址,
拿到IP地址以后PXE继续引导计算机与网络中的TFTP客户端建立连接,
从而从TFTP服务器中获取开机引导文件之后请求并下载安装需要的文件。
在这个过程中需要一台服务器来提供启动文件、安装文件、
以及安装过程中的自动应答文件等
2.2 pxe工作流程图
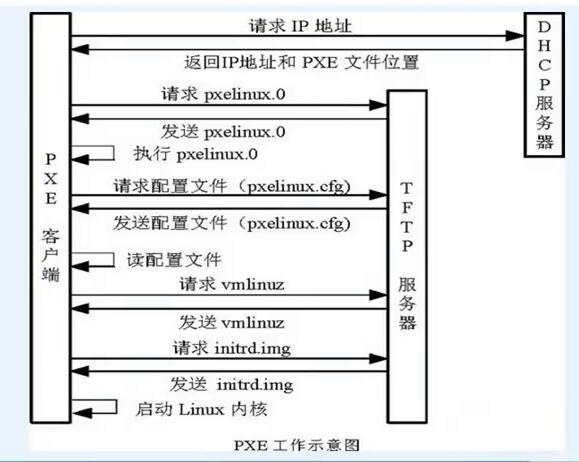
原理介绍
- Client向PXE Server上的DHCP发送IP地址请求消息,DHCP检测Client是否合法(主要是检测Client的网卡MAC地址),如果合法则返回Client的IP地址,同时将启动文件pxelinux.0的位置信息一并传送给Client
- Client向PXE Server上的TFTP发送获取pxelinux.0请求消息,TFTP接收到消息之后再向Client发送pxelinux.0大小信息,试探Client是否满意,当TFTP收到Client发回的同意大小信息之后,正式向Client发送pxelinux.0
- Client执行接收到的pxelinux.0文件
- Client向TFTP Server发送针对本机的配置信息文件(在TFTP服务的pxelinux.cfg目录下,这是系统菜单文件,格式和isolinux.cfg格式一样,功能也是类似),TFTP将配置文件发回Client,继而Client根据配置文件执行后续操作。
- Client向TFTP发送Linux内核请求信息,TFTP接收到消息之后将内核文件发送给Client
- Client向TFTP发送根文件请求信息,TFTP接收到消息之后返回Linux根文件系统
- Client启动Linux内核
- Client下载安装源文件,读取自动化安装脚本
3 cobbler
3.1 cobbler工作流程
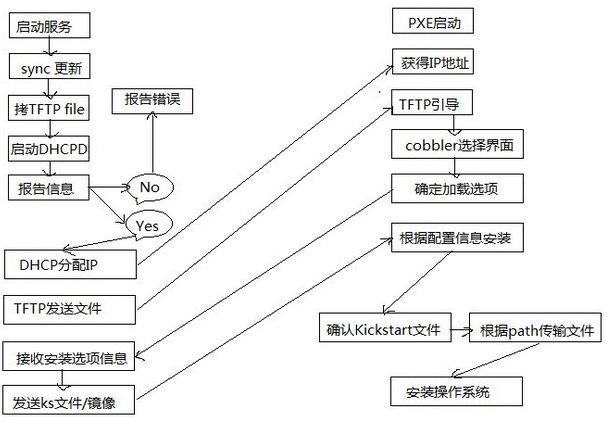
- client裸机配置了从网络启动后,开机后会广播包请求DHCP服务器 (cobbler server)发送其分配好的一个IP
- DHCP服务器(cobbler server)收到请求后发送responese,包括其ip地址
- client裸机拿到ip后再向cobbler server发送请求OS引导文件的请求
- cobbler server告诉裸机OS引导文件的名字和TFTP server的ip和 port
- client裸机通过上面告知的TFTP server地址通信,下载引导文件
- client裸机执行执行该引导文件,确定加载信息,选择要安装的os, 期间会再向cobbler server请求kickstart文件和os image
- cobbler server发送请求的kickstart和os iamge
- client裸机加载kickstart文件
- client裸机接收os image,安装该os image
3.3 Cobbler集成的服务
PXE服务支持
DHCP服务管理
DNS服务管理(可选bind,dnsmasq)
电源管理
Kickstart服务支持
YUM仓库管理
TFTP(PXE启动时需要)
Apache(提供kickstart的安装源,并提供定制化的kickstart配置)
3.4 配置目录
配置文件目录:
/etc/cobbler
/etc/cobbler/settings : cobbler 主配置文件
/etc/cobbler/iso/: iso模板配置文件
/etc/cobbler/pxe: pxe模板文件
/etc/cobbler/power: 电源配置文件
/etc/cobbler/user.conf: web服务授权配置文件
/etc/cobbler/users.digest: web访问的用户名密码配置文件
/etc/cobbler/dhcp.template : dhcp服务器的的配置末班
/etc/cobbler/dnsmasq.template : dns服务器的配置模板
/etc/cobbler/tftpd.template : tftp服务的配置模板
/etc/cobbler/modules.conf : 模块的配置文件
数据目录:
/var/lib/cobbler/config/: 用于存放distros,system,profiles 等信 息配置文件
/var/lib/cobbler/triggers/: 用于存放用户定义的cobbler命令
/var/lib/cobbler/kickstart/: 默认存放kickstart文件
/var/lib/cobbler/loaders/: 存放各种引导程序 镜像目录
/var/www/cobbler/ks_mirror/: 导入的发行版系统的所有数据
/var/www/cobbler/images/ : 导入发行版的kernel和initrd镜像用于 远程网络启动
/var/www/cobbler/repo_mirror/: yum 仓库存储目录
日志目录:
/var/log/cobbler/installing: 客户端安装日志
/var/log/cobbler/cobbler.log : cobbler日志
3.5 命令介绍
cobbler commands介绍
cobbler check 核对当前设置是否有问题
cobbler list 列出所有的cobbler元素
cobbler report 列出元素的详细信息
cobbler sync 同步配置到数据目录,更改配置最好都要执行下
cobbler reposync 同步yum仓库
cobbler distro 查看导入的发行版系统信息
cobbler system 查看添加的系统信息
cobbler profile 查看配置信息
3.6 /etc/cobbler/settings中重要的参数设置
default_password_crypted: "$1$gEc7ilpP$pg5iSOj/mlxTxEslhRvyp/"
manage_dhcp:1
manage_tftpd:1
pxe_just_once:1
next_server:< tftp服务器的 IP 地址>
server:
4. cobbler install
4.1 系统信息
[root@cobbler ~]# getenforce
Disabled
[root@cobbler ~]# systemctl status firewalld.service
● firewalld.service - firewalld - dynamic firewall daemon
Loaded: loaded (/usr/lib/systemd/system/firewalld.service; disabled; vendor preset: enabled)
Active: inactive (dead)
Docs: man:firewalld(1)
[root@cobbler ~]# cat /etc/redhat-release
CentOS Linux release 7.5.1804 (Core)
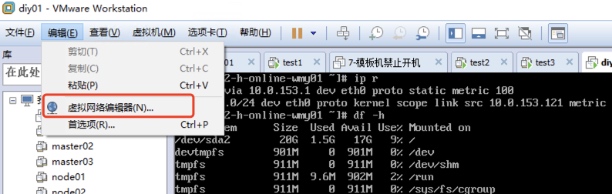
[root@cobbler ~]# ip r
default via 10.0.153.1 dev eth0 proto static metric 100
10.0.153.1 dev eth0 proto static scope link metric 100
10.0.153.116 dev eth0 proto kernel scope link src 10.0.153.116 metric 100
192.168.122.0/24 dev virbr0 proto kernel scope link src 192.168.122.1
[root@cobbler ~]# hostname
cobbler
4.1.1 ks文件
ks.cfg文件组成大致分为3段

命令段
键盘类型,语言,安装方式等系统的配置,有必选项和可选项,如果缺少某项必选项,安装时会中断并提示用户选择此项的选项

软件包段

%packages
@groupname:指定安装的包组
package_name:指定安装的包
-package_name:指定不安装的包
在安装过程中默认安装的软件包,安装软件时会自动分析依赖关系。

脚本段(可选)
%pre:安装系统前执行的命令或脚本(由于只依赖于启动镜像,支持的命令很少)
%post:安装系统后执行的命令或脚本(基本支持所有命令)
| 关键字 | 含义 |
|---|---|
| install | 告知安装程序,这是一次全新安装,而不是升级upgrade。 |
| url --url=" " | 通过FTP或HTTP从远程服务器上的安装树中安装。 url --url="http://10.0.153.118/CentOS-7/" url --url ftp:// |
| nfs | 从指定的NFS服务器安装。 nfs --server=nfsserver.example.com --dir=/tmp/install-tree |
| text|graphical | tesxt:使用文本模式安装。 graphical:在图形模式下根据kickstart执行安装,默认该选项 |
| lang | 设置在安装过程中使用的语言以及系统的缺省语言。lang en_US.UTF-8 |
| keyboard | 设置系统键盘类型。keyboard us |
| zerombr | 清除mbr引导信息。 |
| bootloader | 系统引导相关配置。 bootloader --location=mbr --driveorder=sda --append="crashkernel=auto rhgb quiet" --location=,指定引导记录被写入的位置.有效的值如下:mbr(缺省),partition(在包含内核的分区的第一个扇区安装引导装载程序)或none(不安装引导装载程序)。 --driveorder,指定在BIOS引导顺序中居首的驱动器。 --append=,指定内核参数.要指定多个参数,使用空格分隔它们。 |
| network | 为通过网络的kickstart安装以及所安装的系统配置联网信息。 network --bootproto=dhcp --device=eth0 --onboot=yes --noipv6 --hostname=CentOS6 --bootproto=[dhcp/bootp/static]中的一种,缺省值是dhcp。bootp和dhcp被认为是相同的。 static方法要求在kickstart文件里输入所有的网络信息。 network --bootproto=static --ip=10.0.0.100 --netmask=255.255.255.0 --gateway=10.0.0.2 --nameserver=10.0.0.2 请注意所有配置信息都必须在一行上指定,不能使用反斜线来换行。 --ip=,要安装的机器的IP地址. --gateway=,IP地址格式的默认网关. --netmask=,安装的系统的子网掩码. --hostname=,安装的系统的主机名. --onboot=,是否在引导时启用该设备. --noipv6=,禁用此设备的IPv6. --nameserver=,配置dns解析. |
| timezone | 设置系统时区。timezone --utc Asia/Shanghai |
| authconfig | 系统认证信息。authconfig --enableshadow --passalgo=sha512 设置密码加密方式为sha512 启用shadow文件。 |
| rootpw | root密码 |
| clearpart | 清空分区。clearpart --all --initlabel --all 从系统中清除所有分区,--initlable 初始化磁盘标签 |
| part | 磁盘分区。 part /boot --fstype=ext4 --asprimary --size=200 centos7 是--fstype=xfs part swap --size=1024 part / --fstype=ext4 --grow --asprimary --size=200 --fstype=,为分区设置文件系统类型.有效的类型为ext2,ext3,swap和vfat。 --asprimary,强迫把分区分配为主分区,否则提示分区失败。 --size=,以MB为单位的分区最小值.在此处指定一个整数值,如500.不要在数字后面加MB。 --grow,告诉分区使用所有可用空间(若有),或使用设置的最大值。 |
| firstboot | 负责协助配置redhat一些重要的信息。 firstboot --disable |
| selinux | 关闭selinux。selinux --disabled |
| firewall | 关闭防火墙。firewall --disabled |
| logging | 设置日志级别。logging --level=info |
| reboot | 设定安装完成后重启,此选项必须存在,不然kickstart显示一条消息,并等待用户按任意键后才重新引导,也可以选择halt关机。 |
4.2 配置yum源
curl -o /etc/yum.repos.d/CentOS-Base.repo http://mirrors.aliyun.com/repo/Centos-7.repo
curl -o /etc/yum.repos.d/epel.repo http://mirrors.aliyun.com/repo/epel-7.repo
yum makecache fast
4.3 此次使用docker部署
常规部署参考
https://www.cnblogs.com/linuxliu/p/7668048.html
4.3.1 构建镜像
FROM centos:7.2.1511

MAINTAINER 595265578@qq.com

RUN yum -y install epel-release vim net-tools
RUN yum -y install httpd tftp cobbler cobbler-web dhcp xinetd syslinux pykickstart bind && yum clean all
RUN (cd /lib/systemd/system/sysinit.target.wants/; for i in *; \
do [ $i == systemd-tmpfiles-setup.service ] || rm -f $i; done); \
rm -f /lib/systemd/system/multi-user.target.wants/*;\
rm -f /etc/systemd/system/*.wants/*;\
rm -f /lib/systemd/system/local-fs.target.wants/*; \
rm -f /lib/systemd/system/sockets.target.wants/*udev*; \
rm -f /lib/systemd/system/sockets.target.wants/*initctl*; \
rm -f /lib/systemd/system/basic.target.wants/*;\
rm -f /lib/systemd/system/anaconda.target.wants/*;
VOLUME [ "/sys/fs/cgroup" ]

RUN systemctl enable cobblerd;systemctl enable httpd;systemctl enable dhcpd
RUN sed -i -e 's/\(^.*disable.*=\) yes/\1 no/' /etc/xinetd.d/tftp
RUN touch /etc/xinetd.d/rsync

EXPOSE 69
EXPOSE 80
EXPOSE 443
EXPOSE 25151

CMD ["/sbin/init"]
4.3.2 build
docker build . -t cobbler:1.0
4.3.3 运行镜像
启动容器前我们要先修改配置文件settings和dhcp.template,下文的10.0.153.118为docker宿主机的IP地址。
将容器内部settings dhcp.template文件拷贝至/opt 目录
settings文件中需要修改的内容为:
server: 192.168.101.100         #cobbler的服务器地址

next_server: 10.0.153.118       #tftp服务器地址

manage_dhcp: 1             #dhcpg管理设置为1,启用dhcp
dhcp.template文件中需要修改的内容为:

subnet 10.0.153.118 netmask 255.255.255.0 {        #修改网段

   option routers       10.0.153.1;       #指定网关

   option domain-name-servers 10.0.153.118;      #指定dns

   option subnet-mask     255.255.255.0;      #指定子网掩码

   range dynamic-bootp    10.0.153.120 10.0.153.200;   #指定地址池
修改完成后保存文件,并使用如下命令启动容器:
docker run \
-d \
--privileged \
--net host \
-v /sys/fs/cgroup:/sys/fs/cgroup:ro \
-v /etc/selinux:/etc/selinux \
-v /opt/settings:/etc/cobbler/settings \
-v /opt/dhcp.template:/etc/cobbler/dhcp.template \
-p 69:69 \
-p 80:80 \
-p 443:443 \
-p 25151:25151 \
--name cobbler1.0 cobbler:1.0
4.3.4 打开浏览器,确认cobbler_web可以访问
账号和密码 cobbler/cobbler
4.3.5 上传镜像
vmware挂在iso镜像
系统执行命令
mount /dev/cdrom /mnt
拷贝镜像到容器内
docker cp /mnt cobbler1.0:/opt/iso7
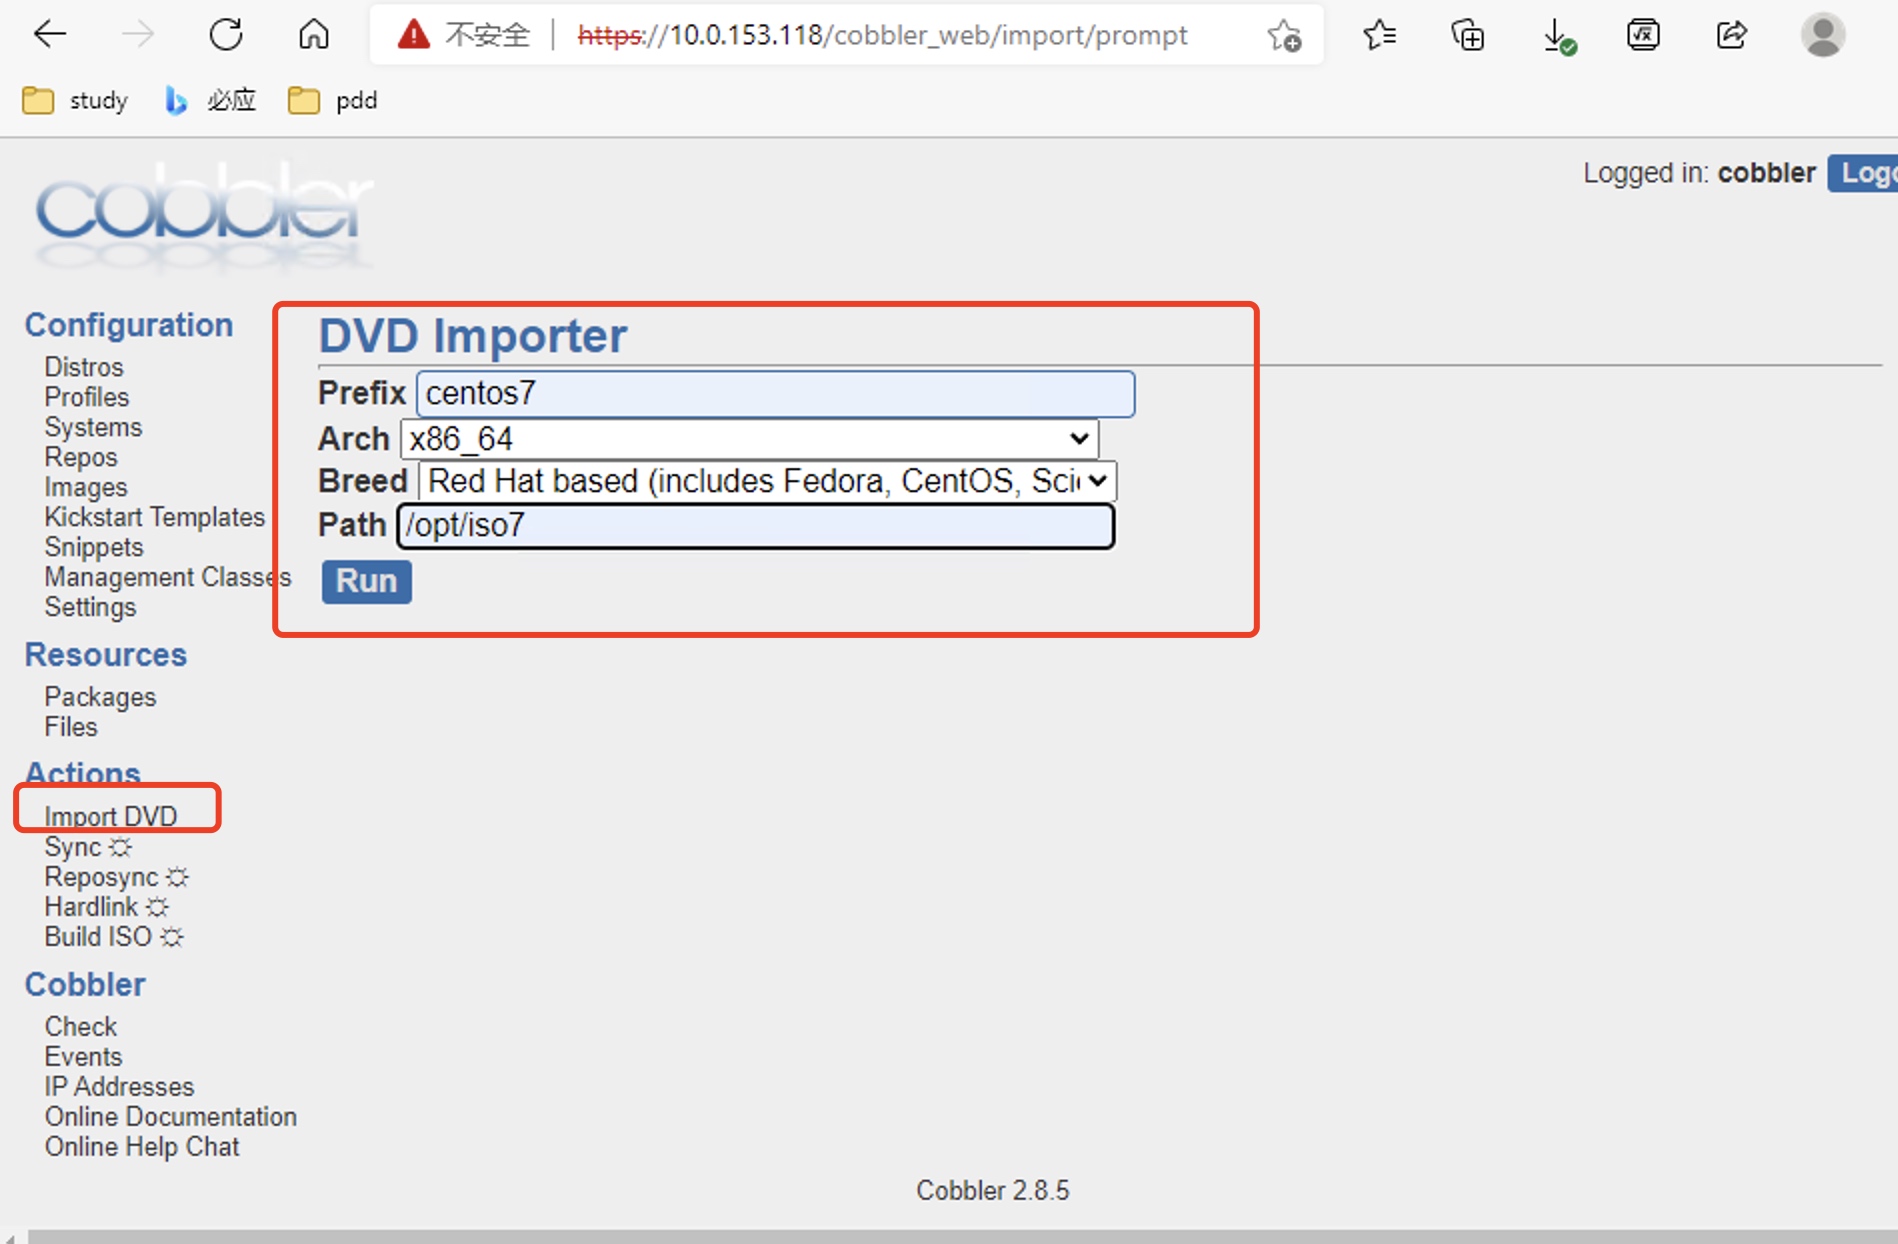

出现如上提示说明上传完成,之后点击Configuration模块的Distros,检查刚刚上传的镜像。
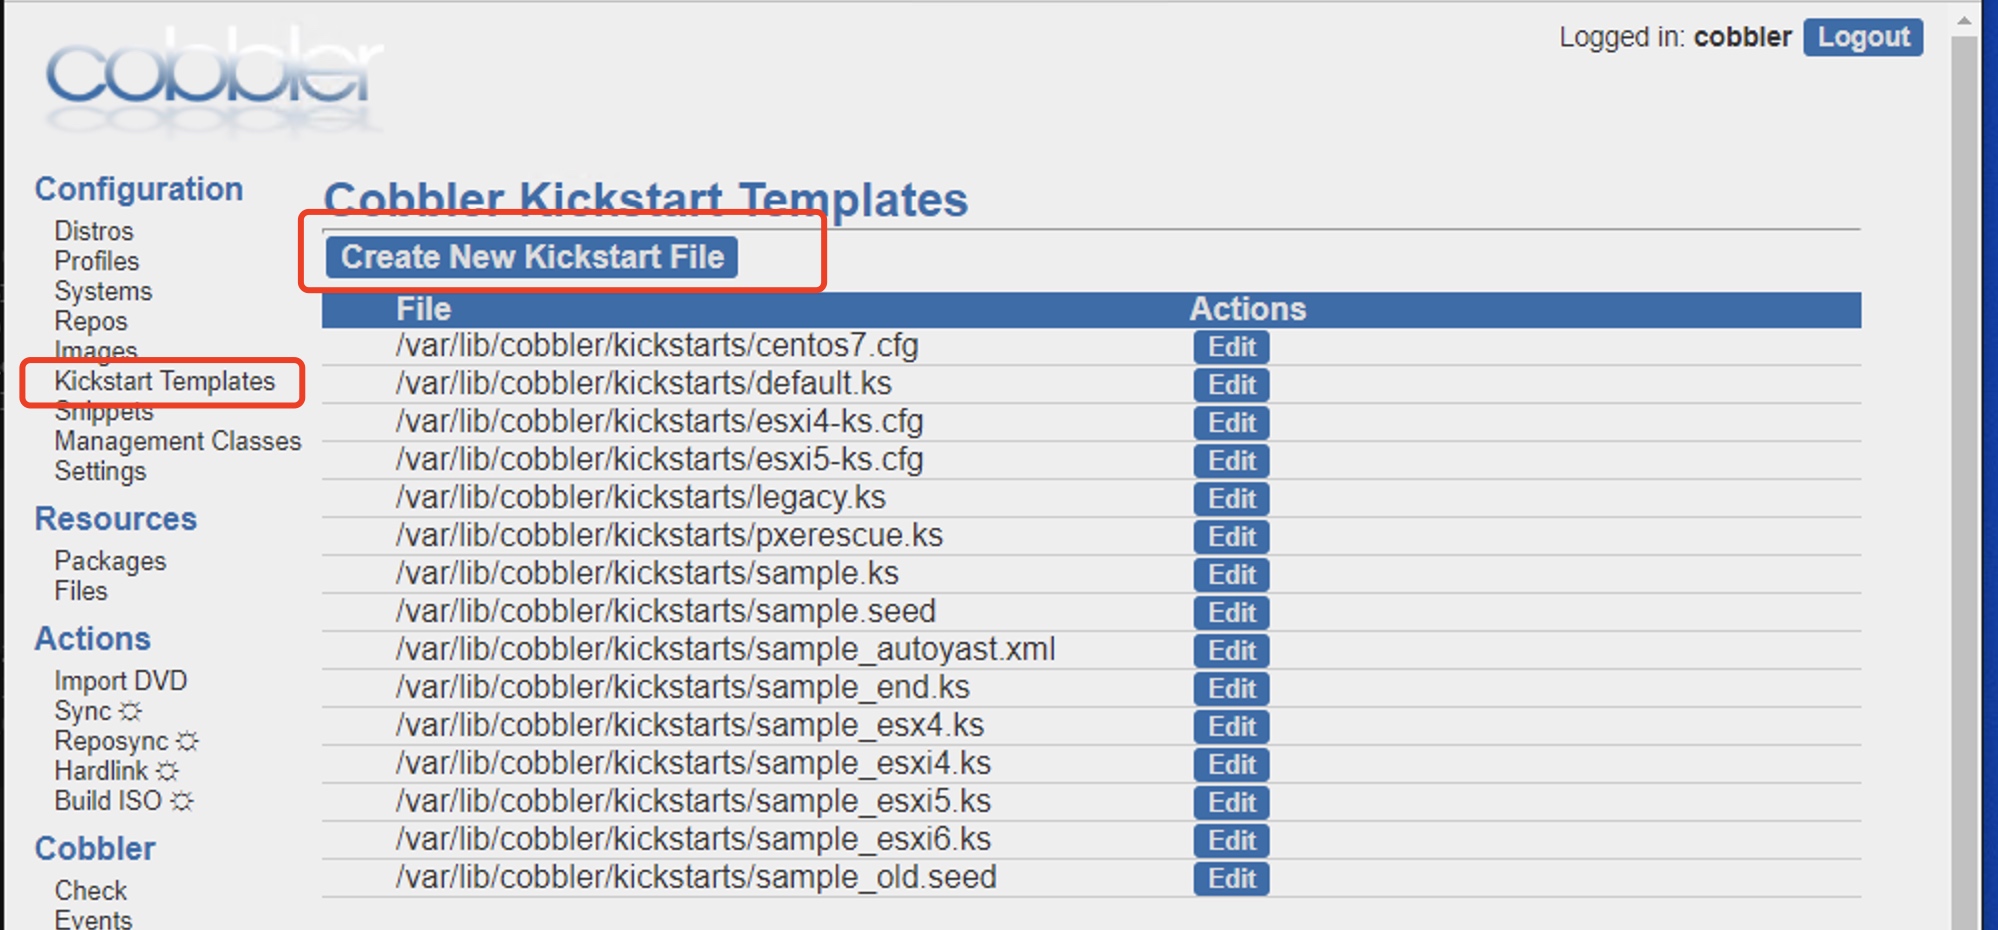
4.3.6 ks文件
服务器密码123456
配置方法 修改settings文件 default_password_crypted
[root@cobbler cobbler]# cat settings |grep pass
# what install (root) password is set up for those
# The simplest way to change the password is to run
# openssl passwd -1
default_password_crypted: "$1$random-p$mzxQ/Sx848sXgvfwJCoZM0"
# boot menu.  Adding a password to the boot menus templates
ldap_search_passwd: ''
# This setting is also used by the code that supports using Spacewalk/Satellite users/passwords
# URL will be passed directly to the kickstarting system, thus bypassing
[root@cobbler cobbler]# openssl passwd -1 -salt 'random-phrase-here' '123456'
$1$random-p$mzxQ/Sx848sXgvfwJCoZM0
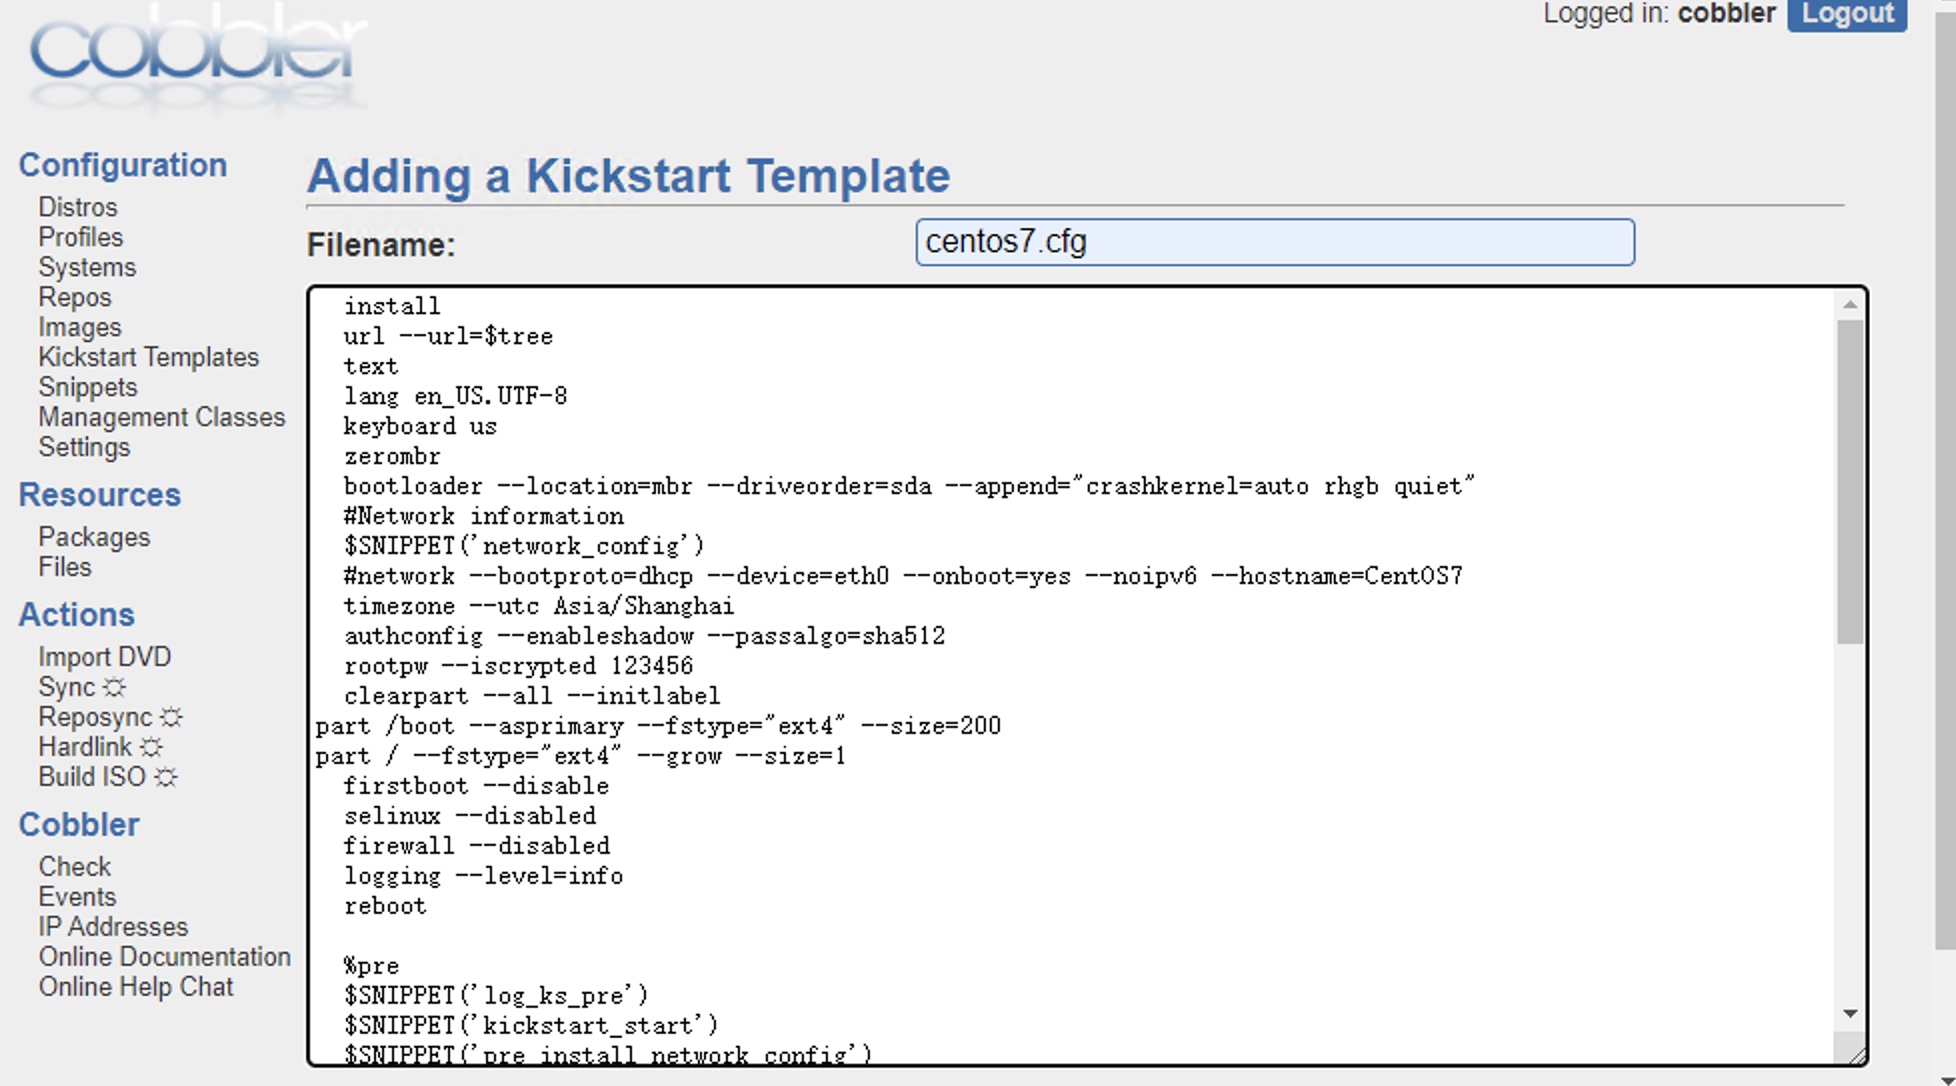
ks文件模版
    install
  url --url=$tree
  text
  lang en_US.UTF-8
  keyboard us
  zerombr
  bootloader --location=mbr --driveorder=sda --append="crashkernel=auto rhgb quiet"
  #Network information
  $SNIPPET('network_config')
  #network --bootproto=dhcp --device=eth0 --onboot=yes --noipv6 --hostname=CentOS7
  timezone --utc Asia/Shanghai
  authconfig --enableshadow --passalgo=sha512
  rootpw --iscrypted $default_password_crypted
  clearpart --all --initlabel
  part /boot --asprimary --fstype="ext4" --size=200
  part / --fstype="ext4" --grow --size=1
  firstboot --disable
  selinux --disabled
  firewall --disabled
  logging --level=info
  reboot

  %pre
  $SNIPPET('log_ks_pre')
  $SNIPPET('kickstart_start')
  $SNIPPET('pre_install_network_config')
  # Enable installation monitoring
  $SNIPPET('pre_anamon')
  %end

  %packages
  @^minimal
  @compat-libraries
  @core
  @debugging
  @development
  bash-completion
  chrony
  dos2unix
  kexec-tools
  lrzsz
  nmap
  sysstat
  telnet
  tree
  vim
  wget
  net-tools
  %end

  %post
  systemctl disable postfix.service
curl -o /etc/yum.repos.d/CentOS-Base.repo http://mirrors.aliyun.com/repo/Centos-7.repo
curl -o /etc/yum.repos.d/epel.repo http://mirrors.aliyun.com/repo/epel-7.repo
  %end
5 使用koan实现重新安装系统
5.1 在客户端安装koan
[root@localhost ~]# rpm -ivh http://dl.fedoraproject.org/pub/epel/7/x86_64/e/epel-release-7-10.noarch.rpm

如何不能使用 请参考上面的阿里云源即可
curl -o /etc/yum.repos.d/CentOS-Base.repo http://mirrors.aliyun.com/repo/Centos-7.repo
curl -o /etc/yum.repos.d/epel.repo http://mirrors.aliyun.com/repo/epel-7.repo
[root@localhost ~]# yum install koan -y
5.1 查看cobbler上的配置文件
1 [root@localhost ~]# koan --server=10.0.153.118 --list=profiles
2 - looking for Cobbler at http://10.0.0.101:80/cobbler_api
3 centos7-x86_64
重新安装客户端系统
[root@localhost ~]# koan --replace-self --server=10.0.153.118 --profile=centos7-x86_64
重启系统后会自动重装系统
6 通过dhcp 识别mac地址 自动安装
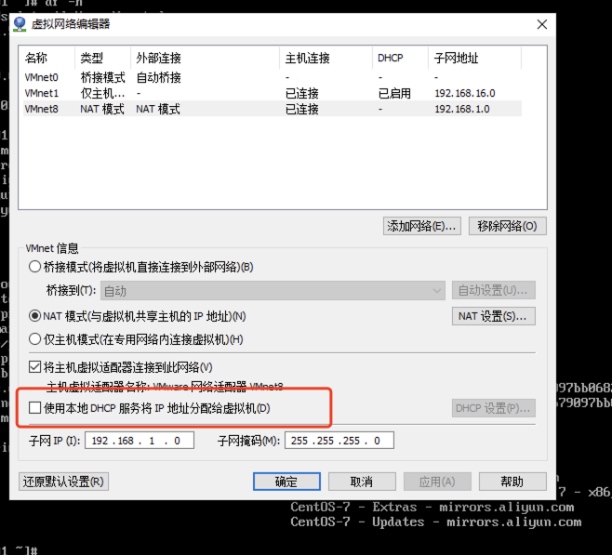
需要关闭vmware dhcp服务 新创建的虚拟机为桥接模式
cobbler配置
[root@cobbler ~]# egrep -v "^#|^$" /etc/cobbler/settings
---
allow_duplicate_hostnames: 0
allow_duplicate_ips: 0
allow_duplicate_macs: 0
allow_dynamic_settings: 0
anamon_enabled: 0
authn_pam_service: "login"
auth_token_expiration: 3600
build_reporting_enabled: 0
build_reporting_sender: ""
build_reporting_email: [ 'root@localhost' ]
build_reporting_smtp_server: "localhost"
build_reporting_subject: ""
build_reporting_ignorelist: [ "" ]
cheetah_import_whitelist:
 - "random"
 - "re"
 - "time"
createrepo_flags: "-c cache -s sha"
default_kickstart: /var/lib/cobbler/kickstarts/default.ks
default_name_servers: []
default_ownership:
 - "admin"
default_password_crypted: "$1$random-p$mzxQ/Sx848sXgvfwJCoZM0"
default_template_type: "cheetah"
default_virt_bridge: xenbr0
default_virt_file_size: 5
default_virt_ram: 512
default_virt_type: xenpv
enable_gpxe: 0
enable_menu: 1
func_auto_setup: 0
func_master: overlord.example.org
http_port: 80
kernel_options:
 ksdevice: bootif
 lang: ' '
 text: ~
kernel_options_s390x:
 RUNKS: 1
 ramdisk_size: 40000
 root: /dev/ram0
 ro: ~
 ip: off
 vnc: ~
ldap_server: "ldap.example.com"
ldap_base_dn: "DC=example,DC=com"
ldap_port: 389
ldap_tls: 1
ldap_anonymous_bind: 1
ldap_search_bind_dn: ''
ldap_search_passwd: ''
ldap_search_prefix: 'uid='
ldap_tls_cacertfile: ''
ldap_tls_keyfile: ''
ldap_tls_certfile: ''
mgmt_classes: []
mgmt_parameters:
 from_cobbler: 1
puppet_auto_setup: 0
sign_puppet_certs_automatically: 0
puppetca_path: "/usr/bin/puppet"
remove_old_puppet_certs_automatically: 0
manage_dhcp: 1
manage_dns: 0
bind_chroot_path: ""
bind_master: 127.0.0.1
manage_genders: 0
bind_manage_ipmi: 0
manage_tftpd: 1
manage_rsync: 0
manage_forward_zones: []
manage_reverse_zones: []
next_server: 10.0.153.118
power_management_default_type: 'ipmitool'
power_template_dir: "/etc/cobbler/power"
pxe_just_once: 1
pxe_template_dir: "/etc/cobbler/pxe"
consoles: "/var/consoles"
redhat_management_type: "off"
redhat_management_server: "xmlrpc.rhn.redhat.com"
redhat_management_key: ""
redhat_management_permissive: 0
register_new_installs: 0
reposync_flags: "-l -n -d"
restart_dns: 1
restart_dhcp: 1
run_install_triggers: 1
scm_track_enabled: 0
scm_track_mode: "git"
server: 10.0.153.118
client_use_localhost: 0
client_use_https: 0
snippetsdir: /var/lib/cobbler/snippets
template_remote_kickstarts: 0
virt_auto_boot: 1
webdir: /var/www/cobbler
xmlrpc_port: 25151
yum_post_install_mirror: 1
yum_distro_priority: 1
yumdownloader_flags: "--resolve"
serializer_pretty_json: 0
replicate_rsync_options: "-avzH"
replicate_repo_rsync_options: "-avzH"
always_write_dhcp_entries: 0
proxy_url_ext: ""
proxy_url_int: ""
[root@cobbler ~]# egrep -v "^#|^$" /etc/cobbler/dhcp.template
ddns-update-style interim;
allow booting;
allow bootp;
ignore client-updates;
set vendorclass = option vendor-class-identifier;
option pxe-system-type code 93 = unsigned integer 16;
subnet 10.0.153.0 netmask 255.255.255.0 {
     option routers             10.0.153.1;
     option domain-name-servers 10.0.153.118;
     option subnet-mask         255.255.255.0;
     range dynamic-bootp        10.0.153.120 10.0.153.200;
     default-lease-time         21600;
     max-lease-time             43200;
     next-server                $next_server;
     class "pxeclients" {
          match if substring (option vendor-class-identifier, 0, 9) = "PXEClient";
          if option pxe-system-type = 00:02 {
                  filename "ia64/elilo.efi";
          } else if option pxe-system-type = 00:06 {
                  filename "grub/grub-x86.efi";
          } else if option pxe-system-type = 00:07 {
                  filename "grub/grub-x86_64.efi";
          } else if option pxe-system-type = 00:09 {
                  filename "grub/grub-x86_64.efi";
          } else {
                  filename "pxelinux.0";
          }
     }
}
    ## group could be subnet if your dhcp tags line up with your subnets
    ## or really any valid dhcpd.conf construct ... if you only use the
    ## default dhcp tag in cobbler, the group block can be deleted for a
    ## flat configuration
group {
        #for mac in $dhcp_tags[$dhcp_tag].keys():
            #set iface = $dhcp_tags[$dhcp_tag][$mac]
    host $iface.name {
        #if $iface.interface_type == "infiniband":
        option dhcp-client-identifier = $mac;
        #else
        hardware ethernet $mac;
        #end if
        #if $iface.ip_address:
        fixed-address $iface.ip_address;
        #end if
        #if $iface.hostname:
        option host-name "$iface.hostname";
        #end if
        #if $iface.netmask:
        option subnet-mask $iface.netmask;
        #end if
        #if $iface.gateway:
        option routers $iface.gateway;
        #end if
        #if $iface.enable_gpxe:
        if exists user-class and option user-class = "gPXE" {
            filename "http://$cobbler_server/cblr/svc/op/gpxe/system/$iface.owner";
        } else if exists user-class and option user-class = "iPXE" {
            filename "http://$cobbler_server/cblr/svc/op/gpxe/system/$iface.owner";
        } else {
            filename "undionly.kpxe";
        }
        #else
        filename "$iface.filename";
        #end if
        ## Cobbler defaults to $next_server, but some users
        ## may like to use $iface.system.server for proxied setups
        next-server $next_server;
        ## next-server $iface.next_server;
    }
        #end for
}
cobbler docker 打开tftp 服务 dhcp服务
systemctl start tftp dhcpd
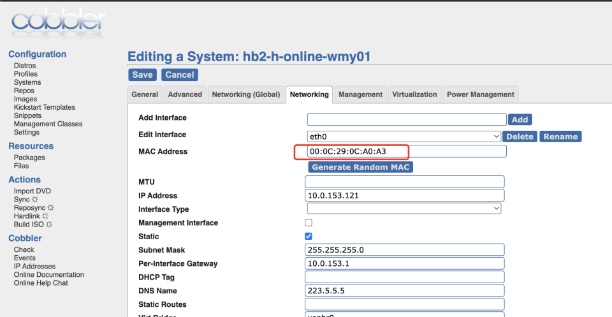
配置好mac地址
以下仅供参考 常规部署
4.3.1 install cobbler
vim /etc/yum.conf
打开keepcache缓存改为1
yum -y install httpd dhcp tftp python-ctypes cobbler  xinetd cobbler-web
4.3.2 start cobbler
systemctl start httpd
systemctl enable httpd
systemctl start cobblerd.service
systemctl enable cobblerd.service
4.3.3 cobbler check
[root@cobbler ~]# cobbler check
The following are potential configuration items that you may want to fix:

1 : The 'server' field in /etc/cobbler/settings must be set to something other than localhost, or kickstarting features will not work.  This should be a resolvable hostname or IP for the boot server as reachable by all machines that will use it.
2 : For PXE to be functional, the 'next_server' field in /etc/cobbler/settings must be set to something other than 127.0.0.1, and should match the IP of the boot server on the PXE network.
3 : change 'disable' to 'no' in /etc/xinetd.d/tftp
4 : Some network boot-loaders are missing from /var/lib/cobbler/loaders.  If you only want to handle x86/x86_64 netbooting, you may ensure that you have installed a *recent* version of the syslinux package installed and can ignore this message entirely.  Files in this directory, should you want to support all architectures, should include pxelinux.0, menu.c32, elilo.efi, and yaboot.
5 : enable and start rsyncd.service with systemctl
6 : debmirror package is not installed, it will be required to manage debian deployments and repositories
7 : The default password used by the sample templates for newly installed machines (default_password_crypted in /etc/cobbler/settings) is still set to 'cobbler' and should be changed, try: "openssl passwd -1 -salt 'random-phrase-here' 'your-password-here'" to generate new one
8 : fencing tools were not found, and are required to use the (optional) power management features. install cman or fence-agents to use them

Restart cobblerd and then run 'cobbler sync' to apply changes.
按照提示一个一个的解决问题:
sed -i 's/^server: 127.0.0.1/server: 10.0.153.116/' /etc/cobbler/settings  # 修改server的ip地址为本机ip

sed -i 's/^next_server: 127.0.0.1/next_server: 10.0.153.116/' /etc/cobbler/settings # TFTP Server 的IP地址


 service tftp
{
        socket_type             = dgram
        protocol                = udp
        wait                    = yes
        user                    = root
        server                  = /usr/sbin/in.tftpd
        server_args             = -s /var/lib/tftpboot
        disable                 = no  # 修改为no
        per_source              = 11
        cps                     = 100 2
        flags                   = IPv4
}

[root@localhost ~]# cobbler get-loaders  # 下载缺失的文件
task started: 2017-10-15_113824_get_loaders
task started (id=Download Bootloader Content, time=Sun Oct 15 11:38:24 2017)
downloading https://cobbler.github.io/loaders/README to /var/lib/cobbler/loaders/README
downloading https://cobbler.github.io/loaders/COPYING.elilo to /var/lib/cobbler/loaders/COPYING.elilo
downloading https://cobbler.github.io/loaders/COPYING.yaboot to /var/lib/cobbler/loaders/COPYING.yaboot
downloading https://cobbler.github.io/loaders/COPYING.syslinux to /var/lib/cobbler/loaders/COPYING.syslinux
downloading https://cobbler.github.io/loaders/elilo-3.8-ia64.efi to /var/lib/cobbler/loaders/elilo-ia64.efi
downloading https://cobbler.github.io/loaders/yaboot-1.3.17 to /var/lib/cobbler/loaders/yaboot
downloading https://cobbler.github.io/loaders/pxelinux.0-3.86 to /var/lib/cobbler/loaders/pxelinux.0
downloading https://cobbler.github.io/loaders/menu.c32-3.86 to /var/lib/cobbler/loaders/menu.c32
downloading https://cobbler.github.io/loaders/grub-0.97-x86.efi to /var/lib/cobbler/loaders/grub-x86.efi
downloading https://cobbler.github.io/loaders/grub-0.97-x86_64.efi to /var/lib/cobbler/loaders/grub-x86_64.efi
*** TASK COMPLETE ***


添加rsync到自启动并启动rsync
systemctl enable rsyncd
systemctl start rsyncd

修改密码为123456 ,salt后面是常用的加盐方式加密
[root@cobbler ~]# openssl passwd -1 -salt '123456' '123456'
$1$123456$wOSEtcyiP2N/IfIl15W6Z0

vim /etc/cobbler/settings # 修改settings配置文件中下面位置,把新生成的密码加进去
default_password_crypted: "$1$123456$wOSEtcyiP2N/IfIl15W6Z0
再次执行cobbler check
[root@cobbler ~]# cobbler check
The following are potential configuration items that you may want to fix:

1 : Some network boot-loaders are missing from /var/lib/cobbler/loaders.  If you only want to handle x86/x86_64 netbooting, you may ensure that you have installed a *recent* version of the syslinux package installed and can ignore this message entirely.  Files in this directory, should you want to support all architectures, should include pxelinux.0, menu.c32, elilo.efi, and yaboot.
2 : debmirror package is not installed, it will be required to manage debian deployments and repositories
3 : fencing tools were not found, and are required to use the (optional) power management features. install cman or fence-agents to use them

Restart cobblerd and then run 'cobbler sync' to apply changes.
ks
#platform=x86, AMD64, or Intel EM64T
#version=DEVEL
# Install OS instead of upgrade
install
# Keyboard layouts
keyboard 'us'
# Root password
rootpw --iscrypted $1$m1pE0DG6$vALBphGGynqvUzfJaWZ6U1
# Use network installation
url --url="$tree"
# System language
lang en_US
# Firewall configuration
firewall --disabled
# System authorization information
auth  --useshadow  --passalgo=sha512
# Use graphical install
graphical
firstboot --disable
# SELinux configuration
selinux --disabled

# Network information
network  --bootproto=dhcp --device=eth0
network  --bootproto=dhcp --device=eth1
# Reboot after installation
reboot
# System timezone
timezone Asia/Shanghai
# System bootloader configuration
bootloader --location=mbr
# Clear the Master Boot Record
zerombr
# Partition clearing information
clearpart --all --initlabel
# Disk partitioning information
part /boot --asprimary --fstype="ext4" --size=200
part / --fstype="ext4" --grow --size=1
%packages
@base
@core
@compat-libraries
@debugging
@development
@gnome-desktop
@X Window System
%end
多谢哦 欢迎进群一块学习