


1.Nginx目录索引
1.Nginx默认是不允许列出整个目录浏览下载。
Syntax: autoindex on | off;
Default:    autoindex off;
Context:    http, server, location


autoindex_exact_size off;
默认为on, 显示出文件的确切大小,单位是bytes。
修改为off,显示出文件的大概大小,单位是kB或者MB或者GB。

autoindex_localtime on;
默认为off,显示的文件时间为GMT时间。
修改为on, 显示的文件时间为文件的服务器时间。

charset utf-8,gbk;
默认中文目录乱码,添加上解决乱码。
2.配置站点目录实现浏览功能
server {
    listen 80;
    server_name module.bgx.com;

    location / {
        root /code/down;
        charset utf-8,gbk;
        autoindex on;
        autoindex_localtime on;
        autoindex_exact_size off;
    }
}
2.Nginx状态监控
1.ngx_http_stub_status_module用于展示Nginx连接状态信息, 需要--with-http_stub_status_module模块支持
Syntax: stub_status;
Default: —
Context: server, location
2.配置Nginx status示例
server {
    listen 80;
    server_name module.bgx.com;
    access_log off;

    location /nginx_status {
        stub_status;
    }
}
3.使用浏览器访问http://IP/nginx_status访问后得到的结果
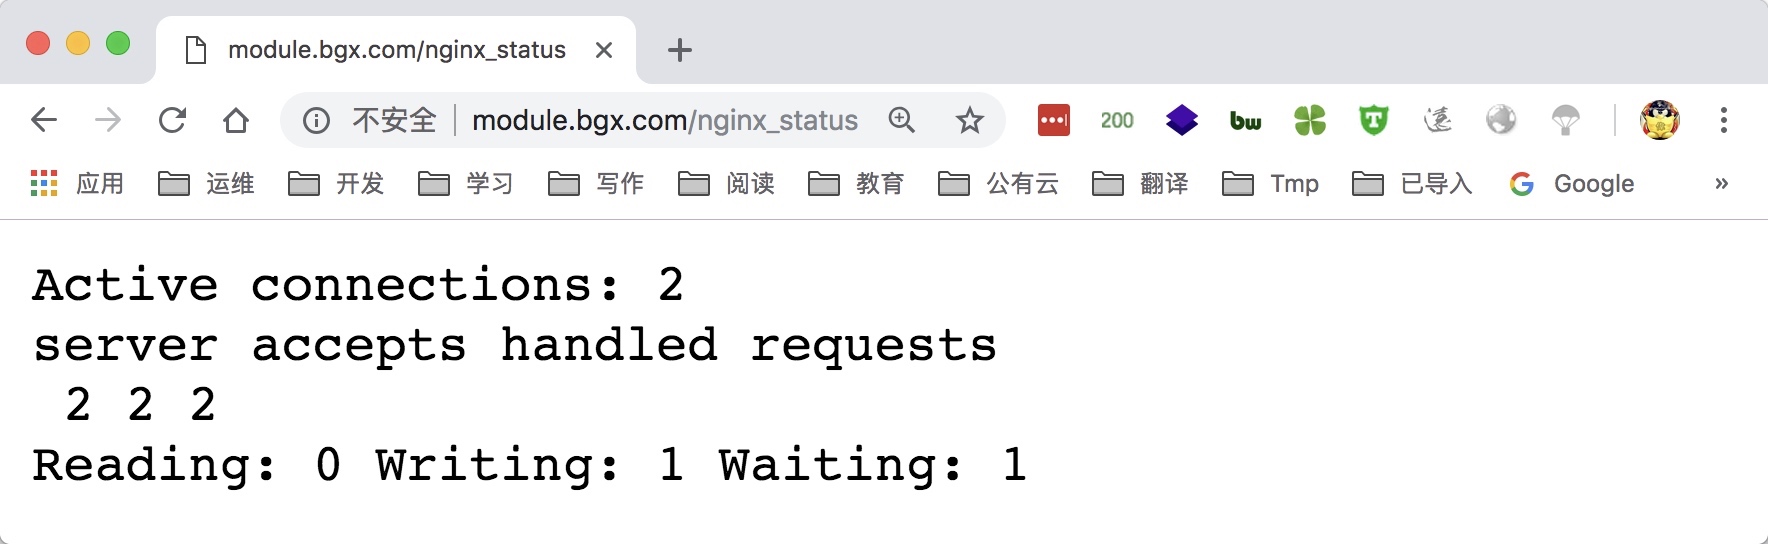
4.Nginx 状态详细信息如下
Active connections
accepts
handled
requests

Reading
Writing
Waiting


keepalive_timeout  0;
keepalive_timeout  65;
3.Nginx访问控制
基于IP的访问控制 http_access_module
基于用户登陆认证 http_auth_basic_module
1.Nginx基于IP的访问控制
Syntax: allow address | CIDR | unix: | all;
Default:    —
Context:    http, server, location, limit_except

Syntax: deny address | CIDR | unix: | all;
Default:    —
Context:    http, server, location, limit_except
1) 访问控制配置示例, 拒绝指定的IP, 其他全部允许
server {
    listen 80;
    server_name module.bgx.com;
    access_log off;

    location /nginx_status {
        stub_status;
        deny 10.0.0.1;
        allow all;
    }
}
2) 访问控制配置示例, 只允许谁能访问, 其它全部拒绝
server {
    listen 80;
    server_name module.bgx.com;
    access_log off;

    location /nginx_status {
        stub_status;
        allow   10.0.0.0/24;
        allow   127.0.0.1;
        deny    all;
    }
}
2.Nginx基于用户登陆认证
1) 基于用户登陆认证配置语法
Syntax: auth_basic string| off;
Default: auth_basic off;
Context: http, server, location, limit_except

Syntax: auth_basic_user_file file;
Default: -
Context: http, server, location, limit_except
2) 基于用户登陆认证配置实践
[root@xuliangwei ~]
[root@xuliangwei ~]


server {
    listen 80;
    server_name module.bgx.com;
    access_log off;

    location /nginx_status {
        stub_status;
        auth_basic "Auth access Blog Input your Passwd!";
        auth_basic_user_file /etc/nginx/auth_conf;
    }
}
4.Nginx访问限制
经常会遇到这种情况,服务器流量异常,负载过大等等。对于大流量恶意的攻击访问, 会带来带宽的浪费,服务器压力,影响业务,往往考虑对同一个ip的连接数,并发数进行限制。ngx_http_limit_conn_module模块可以根据定义的key来限制每个键值的连接数,如同一个IP来源的连接数。
limit_conn_module 连接频率限制limit_req_module 请求频率限制
http协议的连接与请求
HTTP是建立在TCP, 在完成HTTP请求需要先建立TCP三次握手(称为TCP连接),在连接的基础上在HTTP请求。
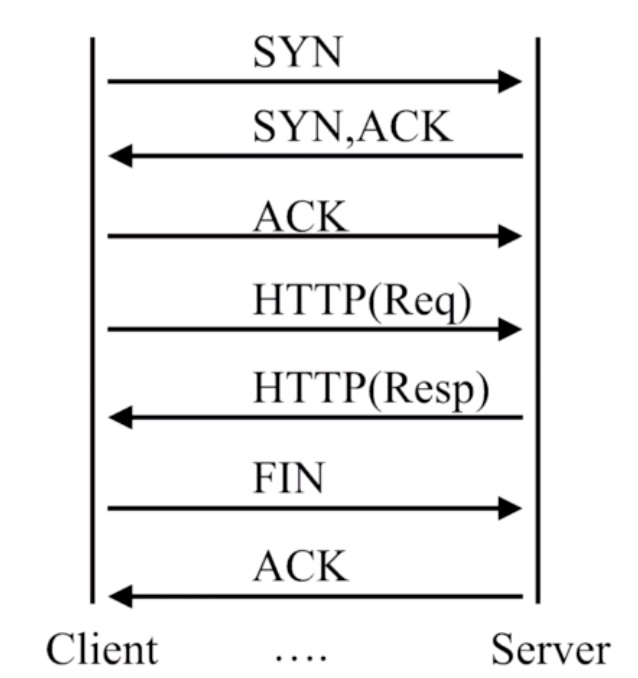
HTTP请求建立在一次TCP连接基础上,一次TCP请求至少产生一次HTTP请求
注:客户端的IP地址作为键。
$remote_addr 变量的长度为7字节到15字节
$binary_remote_addr 变量的长度是固定的4字节
1.Nginx连接限制配置实战
1)Nginx连接限制配置语法
Syntax:  limit_conn_zone key zone=name:size;
Default: —
Context: http

Syntax: limit_conn zone number;
Default: —
Context: http, server, location
2)Nginx连接限制配置实践
limit_conn_zone $binary_remote_addr zone=conn_zone:10m;
server {

    limit_conn conn_zone 1;

    location / {
        root /code;
        index index.html;
    }
3).使用ab工具进行压力测试
[root@xuliangwei ~]
[root@xuliangwei ~]
4).nginx日志结果
2018/10/24 18:04:49 [error] 28656#28656: *1148 limiting connections by zone "conn_zone", client: 123.66.146.123, server: www.xuliangwei.com, request: "GET / HTTP/1.0", host: "www.xuliangwei.com"
2018/10/24 18:04:49 [error] 28656#28656: *1155 limiting connections by zone "conn_zone", client: 123.66.146.123, server: www.xuliangwei.com, request: "GET / HTTP/1.0", host: "www.xuliangwei.com"
2018/10/24 18:04:49 [error] 28656#28656: *1156 limiting connections by zone "conn_zone", client: 123.66.146.123, server: www.xuliangwei.com, request: "GET / HTTP/1.0", host: "www.xuliangwei.com"
2.Nginx请求限制配置实战
1)Nginx请求限制配置语法
Syntax:  limit_req_zone key zone=name:size rate=rate;
Default: —
Context: http

Syntax: limit_conn zone number [burst=number] [nodelay];
Default: —
Context: http, server, location
2)Nginx请求限制配置实战
limit_req_zone $binary_remote_addr zone=req_zone:10m rate=1r/s;
server {
    listen 80;
    server_name module.bgx.com;

    limit_req zone=req_zone;


    limit_req zone=req_zone burst=3 nodelay;
    location / {
        root /code;
        index index.html;
    }
}
3).使用ab工具进行压力测试
[root@xuliangwei ~]
[root@xuliangwei ~]
4).nginx日志结果
2018/10/24 07:38:53 [error] 81020#0: *8 limiting requests, excess: 3.998 by zone "req_zone", client: 10.0.0.10, server: module.bgx.com, request: "GET /index.html HTTP/1.0", host: "10.0.0.10"
2018/10/24 07:38:53 [error] 81020#0: *9 limiting requests, excess: 3.998 by zone "req_zone", client: 10.0.0.10, server: module.bgx.com, request: "GET /index.html HTTP/1.0", host: "10.0.0.10"
2018/10/24 07:38:53 [error] 81020#0: *10 limiting requests, excess: 3.998 by zone "req_zone", client: 10.0.0.10, server: module.bgx.com, request: "GET /index.html HTTP/1.0", host: "10.0.0.10"
3.Nginx连接限制没有请求限制有效?
我们前面说过, 多个请求可以建立在一次的TCP连接之上, 那么我们对请求的精度限制,当然比对一个连接的限制会更加的有效
因为同一时刻只允许一个连接请求进入, 但是同一时刻多个请求可以通过一个连接进入。
所以请求限制才是比较优的解决方案。
5.Nginx虚拟站点
所谓虚拟主机,及在一台服务器上配置多个网站
如: 公司主页、博客、论坛看似三个网站, 实则可以运行在一台服务器上。
1.基于域名虚拟主机配置实战
1.创建web站点目录
[root@bgx ~]
[root@bgx ~]
[root@bgx ~]
2.配置不同域名的虚拟主机
[root@bgx ~]
server {
    listen       80;
    server_name  www.xuliangwei.com;
    root /soft/code/www;
    index index.html;
    ...
}
[root@bgx ~]
server {
    ...
    listen       80;
    server_name  bbs.xuliangwei.com;
    root /soft/code/bbs;
    index index.html;
}
2.基于端口虚拟主机配置实战
//仅修改listen监听端口即可, 但不能和系统端口出现冲突
server {
    ...
    listen       8001;
    ...
}

server {
    ...
    listen       8002;
    ...
}
3.基于虚拟主机别名配置实战
实现用户访问多个域名对应同一个网站, 比如用户访问www.xuliangwei.com和访问xuliangwei.com内容一致
[root@bgx ~]
server {
    listen       80;
    server_name www.bgx.com;
}
server {
    listen       80;
    server_name bgx.com;
}


[root@bgx ~]
server {
    listen       80;
    server_name  www.bgx.com bgx.com;
    ...
}


[root@bgx ~]
Go
[root@bgx ~]
Go
6.Nginx日志配置
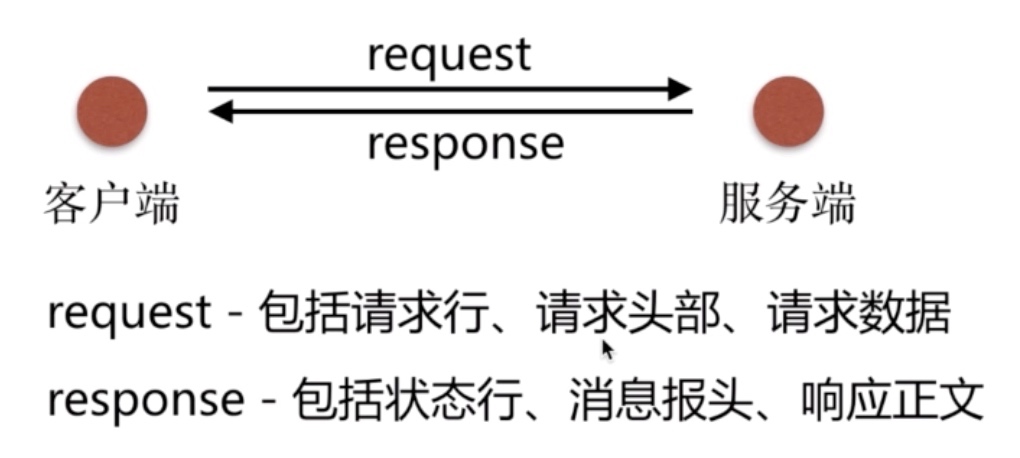
在学习日志之前, 我们需要先回顾下HTTP请求和返回
Nginx有非常灵活的日志记录模式。每个级别的配置可以有各自独立的访问日志。日志格式 通过log_format命令定义格式。
1.log_format定义日志格式语法
# 配置语法: 包括: error.log access.log
Syntax: log_format name [escape=default|json] string ...;
Default: log_format combined "...";
Context: http
2.默认Nginx定义语法格式如下
log_format  main  '$remote_addr - $remote_user [$time_local] "$request" '
                      '$status $body_bytes_sent "$http_referer" '
                      '"$http_user_agent" "$http_x_forwarded_for"';
3.Nginx日志格式允许包含的内置变量
$remote_addr
$remote_user
$time_local
$time_iso8601
$request
$status
$body_bytes_sent
$bytes_sent
$msec
$http_referer
$http_user_agent
$http_x_forwarded_for
$request_length
$request_time
4.access_log日志配置语法
Syntax: access_log path [format [buffer=size] [gzip[=level]] [flush=time] [if=condition]];
access_log off;
Default: access_log logs/access.log combined;
Context: http, server, location, if in location, limit_except
5.Nginx Access日志配置实践
server {
    access_log /var/log/nginx/www.bgx.com.log main;
}


location / {
    access_log /var/log/nginx/www.bgx.com.log main;
}


access_log off;
7.Nginx Location
使用Nginx Location可以控制访问网站的路径, 但一个server可以有多个location配置, 多个location的优先级该如何区分
1.Location语法示例
location [=|^~|~|~*|!~|!~*|/] /uri/ { ...
}
2.Location语法优先级排列
| 匹配符 | 匹配规则 | 优先级 |
|---|---|---|
| = | 精确匹配 | 1 |
| ^~ | 以某个字符串开头 | 2 |
| ~ | 区分大小写的正则匹配 | 3 |
| ~* | 不区分大小写的正则匹配 | 4 |
| !~ | 区分大小写不匹配的正则 | 5 |
| !~* | 不区分大小写不匹配的正则 | 6 |
| / | 通用匹配,任何请求都会匹配到 | 7 |
3.配置网站验证Location优先级
[root@Nginx conf.d]
server {
    listen 80;
    server_name bgx.com;
    location / {
        default_type text/html;
        return 200 "location /";
    }

    location =/ {
        default_type text/html;
        return 200 "location =/";
    }

    location ~ / {
        default_type text/html;
        return 200 "location ~/";
    }


}
4.测试Location效果
[root@Nginx conf.d]
location =/


[root@Nginx ~]
location ~/


[root@Nginx ~]
location /
5.Locaiton应用场景
location / {

}


location ~ \.php$ {
    fastcgi_pass http://127.0.0.1:9000;
}


location ~ \.jsp$ {
    proxy_pass http://127.0.0.1:8080;
}


location ~* .*\.(jpg|gif|png|js|css)$ {
        rewrite (.*) http://cdn.xuliangwei.com$request_uri;
}


location ~* "\.(sql|bak|tgz|tar.gz|.git)$" {
        default_type text/html;
        return 403 "启用访问控制成功";
}
转 xuliangwei.com


评论